Monday, July 18, 2011

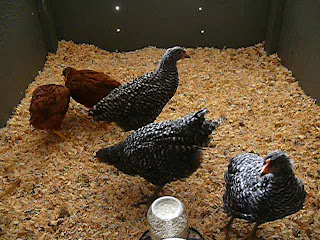
Two Flocks of Chickens

Aidan and Athena, 14 1/2 months old:


Aidan and Back-up, 4 1/2 months old (I would give her a better name, but she was the one with the neurological problem when she was a baby that made her back up and roll over and the name stuck. Btw, she completely healed after a week of Vit. B, Vit. E, neck rubs, and isolation in the house for a week. This was when she was 4 weeks old and we think it was something called wry neck because that was her other symptom; she tucked her neck under to the point that it was twisted nearly all the way around. You'd never know by looking at her now.):


It's not easy integrating two flocks. We are keeping a barrier between the two until the younger hens are eating the same feed blend as the layers. The older one's are aggressive enough that the younger ones will just stay in their coop and not come out during outdoor time if the barrier is down. I know they need to have their pecking order and get that established, so we take the barrier down for awhile every day, but I want them outside also, so we'll put it back up after Athena (the warrior name, go figure, lol) chases them all back inside. If we walk away, she'll even go in and eat up their food, so that's reason #2 to keep them seperate for now. It's interesting to me that Snowball, who is the most skittish around people, is completely accepting of the younger chickens, even sharing scratch with them, which none of the other hens will do.

In a month or so, we'll be building yet another coop (good golly, the FIFTH time) closer to the house and they will all be eating the same feed rations, so they'll just have to get used to each other.

A Few House Updates

The kitchen after sheetrock:


After we painted and they installed the cabinets and sub-floor:


Here are some of the appliances being stored in Aidan's bedroom before they get installed elsewhere:


Ealom's bedroom:


The boys sitting on rolls of carpet padding in mine and Gil's room:


Master bathroom:


Living room with rolls of carpet and trim:

Tuesday, July 12, 2011

Interior paint

The sheetrocking was completed on June 30, and then it was our turn to work on the house; interior painting. What a job! It's nice to have a strong young man for a son who doesn't even need the extension wand to paint ceilings. (I did recommend it nonetheless, but he enjoyed doing it this way also):


Aidan takes a break from painting to make a cleaver belt:


I will have to post more pictures later. :)

Thursday, June 9, 2011

House update

Things are moving right along with the house. The crew worked right through Memorial Day weekend to lay the floor joists, some plumbing (mostly drainage) and get the frame up:


June 1st saw the rafters and roof sheathing go up. It's starting to look like a real house!


This past week has seen the rain gutters added; they are all connected and attached to a huge drainage pipe directed several yards away from the house, which I think is fantastic. In the future the pipe will either get hooked up to a water storage container or empty into a pond.
The shingles were put on, and Aidan got to assist the builder, Darin Baker, staple a few areas of Tyvek wrap with a staple hammer, which was quite the thrill for him.
The electrical and plumbing both have been roughed in, and the following have been installed: the heaters(zonal fan type, which I'm really happy about and hope they are as neat as they sound), shower, tub, and exhaust fan piping.
We visited today and Darin had finished the wrapping and was installing the windows.


We are responsible for clean-up and the boys have been a huge help sorting through piles of rubbish and sorting it all out. I hate all the trash, but we were able to recycle quite a bit, used the cardboard to supress weeds in my future garden area, and we have a huge pile of solid wood scraps for future projects, namely a tree house. I even used quite a few scraps to make a chicken coop extension and the building superintendant, Eric Sundby, came out and used leftovers to build us a shed/well pumphouse. It's not in his contract to do so, but he did. I was quite surprised to see him out there contructing and grateful to have such a great guy supervising our project.

Aunties!

A few more pictures I should've posted a few months back. :)
Bonny came to visit in February and the day after she left we got a visit from Molly. The weather was partly sunny, gorgeous and felt like spring for Bonny (I guess that's why they call it "false spring"), and then Molly got our last winter storm. It was wonderful to see them both.

We had just finished a picnic at a Hood River park:

The boys were sledding on the elementary school hill behind us:

Easter with cousins

I know Easter is well behind us, but I wanted to share a couple of pictures of the boys with their cousins.
I am cracking up that they all wore camouflage to go hunting eggs.

Afterwards we went to the park and I got this shot, which I just love:

Wednesday, May 25, 2011

Concrete!

We were pleasantly surprised today by the presence of cement mixing and pouring equipment, as well as a whole crew of workers out at Bramblewood. They poured the footing for the house and the foundation for the well pump house.


We came back later after they had finished. They did this all in one day. Pretty amazing.

Monday, May 23, 2011

Property Improvements

We were told on Thursday that the building permit is ready and will be picked up by Adair (our builder) first thing Monday morning. 7 1/2 months after filing, it better be ready. I never would have imagined it could take the county that long to get their stuff together and I must say I remain unimpressed with their abilities down at the planning office.
Nevertheless, building should get started soon and we have a few improvements to report on, namely; a much nicer driveway that you don't need 4WD to drive on:


We also have electricity, a well liner, our water report shows good, healthy drinking water (woo-hoo!!!), and they've started to dig out the foundation. You can see the former and the latter in this picture:

New coop

We worked really hard on the new coop and are now starting the expansion to accomodate the chicks when they move in. The expansion will remain separate for a week or so with just chicken wire separating the two flocks before we remove it and they get to interact after having lived next to each other, seeing and hearing each other for a little while first. Hopefully it will make the transition easier, but who knows? I'm just hoping it goes fairly smoothly and nobody gets terribly victimized. I love chickens and am constantly impressed with their antics and cleverness, but they can sure be cruel to each other and could care less as long as they get what they want at times.
They've never picked on each other badly enough to cause any real concern though, and are a pretty darn contented flock most of the time.
Peck still sings everyone to sleep and their instincts are in excellent working order. An example: we've had a hawk fly over a couple of times and I was struck by how quickly they ran for cover before I even noticed it up above. The second time it happened, Peck was still scratching and the others were huddled under a tree hollering at her to get to safety. She looked up like, "what's all the fuss about", then realized what they were bawking about and ran over to join the group. Then they all just waited quietly together for a couple minutes, then back out to peck around some more.
It was actually quite neat to watch, I just hope they stay safe. I know hawks don't need much space to swoop down and grab some dinner.
Here's the coop, done enough to move everyone in:

And here it is a few days later, looking a little more finished:

New Brooder

The chicks were getting a little big for their plastic tote brooder, and I knew they wouldn't be getting into their outdoor space for at least 4 more weeks, so I decided to turn our old utility trailer into a huge brooder.
This was a few weeks ago when they were 6 1/2 weeks old. They are now almost 10 weeks and still have plenty of space; I just want to get them outdoors soon!
Here they are inside:

And here it is from the outside:

.

Monday, March 21, 2011

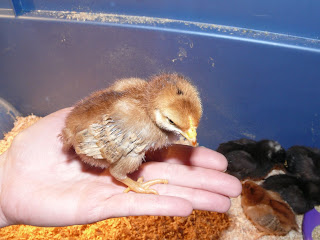
New Chicks!

We have been busy building a chicken coop at Bramblewood, the first structure to grace the new farm. It's coming along nicely, but taking longer than it should because of all the rain. I read that this area averages 17 days of rain in March, and we've had at least 19 so far. The area of excavation and building (all by hand) around the coop is a sticky muddy mess, so I headed out to the feed store for a couple of bales of straw. I got the straw, but I also came home with chicks. :-)
We have been planning on getting 5 new chickens; 3 Barred Plymoth Rocks and 2 Rhode Island Reds, but I figured we'd get them in a few weeks. Well, the feed store had just those two varieties, with other breeds coming in over the next couple of months, but no more of these particular two. It seemed rather fortunate, and since Aidan was begging and making promises of all the work he will be doing if we could just get the chicks today, I figured now was as good a time as any.
It was pretty nice just having to buy food and grit, knowing that we have everything at home from last year. We brought the chicks home, scrubbed and sanitized everything, and they are chirping away merrily. I think they are about six days old.

Here they all are:

And here is a close-up of the tiniest of the flock:

Wednesday, March 16, 2011

Chicken Waterer

A few months ago I read on a blog about how to make a chicken waterer with a bucket and poultry nipples, but now I can't find the blog, so unfortunately can't give proper credit to the inventor of this ingeneous little waterer.
It's pretty simple, so at least I remember how to do it. Theirs did involve two buckets, cutting the bottom off of one and then sliding this completed one inside with a little glue so that you can fill it easily and not crush the nipples on the ground, but I figure we can just set ours on a couple of scrap pieces of 2x4 while we fill it. In our climate, mold is a real concern, and I didn't want cracks I can't get to and clean.

Here is how we made ours:
First I ordered some nipples from www.farmtek.com, STK# WC1030
and a food safe bucket lid (I ordered mine from Azure Standard, but unless you already order from them as a co-op member, you'll have to find one somewhere else. I already had a food safe bucket scavenged from a friend who works at a natural foods store.
The nipples were only $2.05 each & you only need two for each waterer, but the shipping was $11+ whether I ordered 2 or 4, so I ordered 4, figuring I'll be making another waterer eventually anyhow.

Here is what you need:
3 or 5 gallon bucket with lid
2 poultry nipples
drill
11/32 drill bit
silicon (you can buy a small squeeze tube and you won't even need the caulking gun, but I happened to have both of these latter items on hand already)
scissors or in my case wire cutters to snip silicon tube end

I also found these items handy during the process:
pliers (to tighten nipples; looks like they can be tightened with a socket wrench, but pliers were closer and worked just fine)
paper towel to wipe excess silicon and popcicle stick to smooth it:
:

First, drill two holes in the bottom of bucket:

Screw the nipples (from the outside bottom of the bucket) in by hand and then tighten with pliers:

Apply silicon around the base of the nipples, on the outside bottom of the bucket (I smoothed mine with a poscicle stick, but it's probably not necessary:

Let dry for 24 hours, then wash everything, fill with water, put the lid on, and hang from a chain, which is attached to hooks installed in the coop frame. The actual making of the waterer was less than 10 minutes, but of course there is the gathering of supplies and subsequent clean-up, but all in all a very easy project that my 10 and 14 year old sons put together all by themselves with my assistance and direction.
Apparently, some people's chickens catch right on and other's don't, so I can only guess that like many animal "issues", the problem is with the people. One blogger mentioned clicking the little nipples and showing the chickens what to do, and they went for them right away. I'll let you know how it goes and share a couple of pictures of the completed project, as well as it in use.

Monday, January 17, 2011

Silver Lakenvelder

The Lakenvelder has laid nary an egg for the last several weeks, while the Black Stars and Light Brahma continue to lay one every day or every other day at least. Her eggs are very pretty though, they are a white egg called "tinted"; we like to call it "pearl". My picture just doesn't do them justice.


Snowball loves to fly up and hang out on the pole fence, nibbling at pine needles. Of course, that's her favorite spot to escape the yard also.